Create Basic Shader

You need the following Scenome® modules to complete this exercise: Scenome® Platform Binaries

In this exercise you'll learn to create a document that contains a vertex and fragment shader. Then you'll learn how to make basic modifications to the fragment shader, how to rebuild the document, and how to create a texture and display it on screen. This exercise assumes your GPU supports GLSL version 400 or higher.

Start The Shader Application

  1. Start the Shader app. (Start » Programs » Scenomics » Shader) or (Windows® key and then type 'Shader' to find the app icon.)

    The application displays a splash screen and then the application desktop appears. The main menu is composed of three items that contain commands relevant to the current context (which is an empty document). The interface changes when you create a new file or load a file from disk.

    This is a picture of the desktop.

Create New Document

  1. Select File » New » Shader from the main menu.

    The software displays a wizard that allows you to specify the parameters of your new shader. The Profile shown below is 460 core, but you will see the highest GLSL version available on your machine. NOTE: You will not see video or compute shader options in the wizard dialog if you do not have the video or compute add-on modules installed.

    This is a picture of the new project dialog.
  2. Type User Basic in the field named Name.

    Copy Text To Clipboard

    User Basic
  3. Set Profile to the highest value available such as 460 core. If they are present, leave the compute and video options set to false.
  4. Hit ENTER or click OK when you are finished.

    The application creates a new shader document and the main menu options change. You can see the hierarchy on the left, the rendered shader with geometry in the middle, and the property sheet on the right. Shader compiler error messages are shown in the output window below. The shader sets the fragment color to red and does no other work.

    This is a picture of the workspace.

    If the shader compiled successfully, you should see a red square in the center of the worksheet.

  5. Select File » Save from the main menu.

Examine The New Document

  1. Select Desktop » Clear Output from the main menu.
  2. Examine the main menu and select Graph » State » Expand All Tree Items. ( Or hit ALT + X ).

    This expands the graph so that you can see all the nodes. As you can see, this shader is a composite data structure made from a set of atomic types.

    NOTE: You can hover over each node icon, in the image below, for a description of the node and its function.

    That covers the basic information about the graph.

  3. In the running Shader app, move the mouse over the <Program> node named Program.

    Notice that you can see the GLSL version, profile, and source code locations. Many nodes, but not all of them, display useful information if you hover over them.

    This is a picture of the Program node info tip.

Copy The Fragment Shader Path

  1. Examine the hierarchy and right click over the <Program> node named Program. This is a picture of the Program node info tip.
  2. Choose Copy Source Path » Fragment Shader from the listed options.

    This displays a dialog that allows you to select GLSL shader source code (and any include files). The file path of the source item you select will be copied to the Windows® clipboard so you can open it in a text editor.

    This is a picture of the source code used by the <Program> node fragment shader.
  3. Select user_basic_fragment_shader.glsl and click OK or hit ENTER when you are finished.

    This copies the absolute path to the fragment shader source code to the Windows® clipboard. For example, a file path like the following: C:\Users\MyUserName\MyDocuments\Scenomics\Shader\User Basic\460\user_basic_fragment_shader.glsl is copied to the clipboard.

Modify Fragment Shader

  1. Start a text editor of your choice and select the option to open a file from disk.
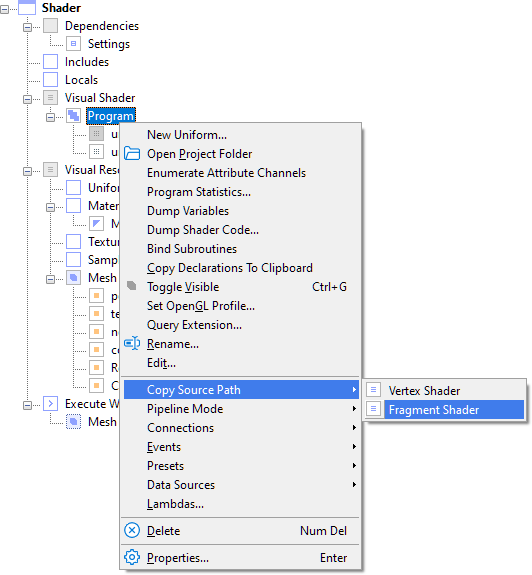
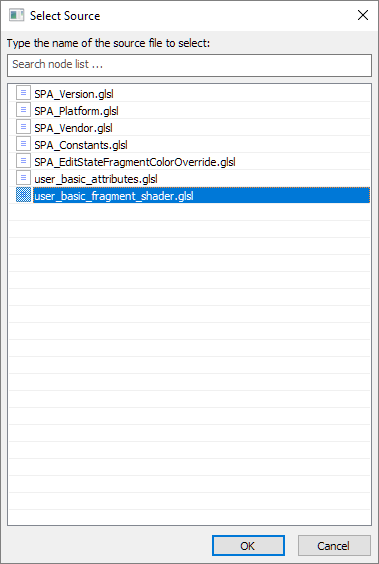
  2. Select CTRL + V to paste the fragment shader file path (into the place in the dialog where you specify the file to open) and open the file.

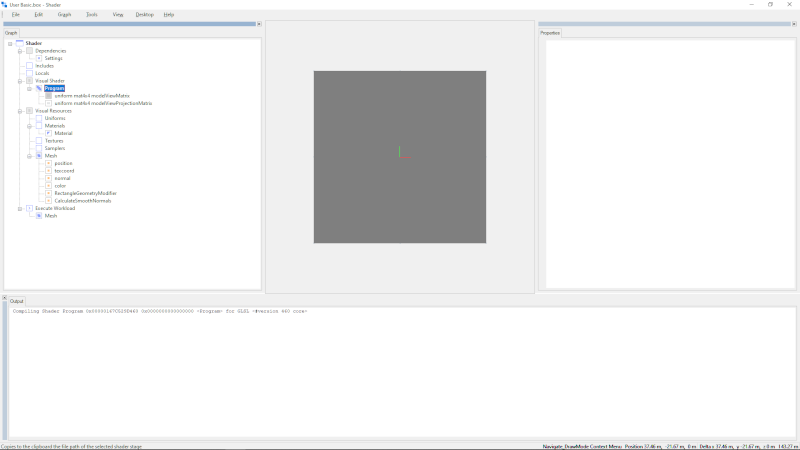
    This is the fragment shader. Note that your #version 460 declaration might be different, depending on the highest GLSL version on your machine. You can still follow this exercise even if the shader code is different. Just follow the steps below and make the same changes in the same locations.

    // #version 460
    // The version number is automatically injected by the application.
    // It is included above for reference purposes only.
    #include <SPA_Version.glsl>
    #include <SPA_Constants.glsl>
    #include <Modules/SPA_EditStateFragmentColorOverride.glsl>
    #include "user_basic_attributes.glsl"
    
    in Data { vertexData attributes; } DataIn;
    out vec4 fragColor;
    
    void main(void)
    {
       fragColor = vec4( 1.0, 0.0, 0.0, 1.0 );
       SPA_EditStateFragmentColorOverride( fragColor );
    }
    

    Scenome supports #include for GLSL. This makes life a lot easier when you're writing shader code. You can dump the fully assembled translation unit at any time if you need to see all your shader code, or when you are ready to take the shader code and use it in your own applications.

    Notice that there is a line #include <Modules/SPA_EditStateFragmentColorOverride.glsl> and a corresponding line SPA_EditStateFragmentColorOverride( fragColor ); at the end of the shader. This is necessary for the Magnifier draw mode to work. If you're using these shaders for other purposes, you can remove the include statement and the call to SPA_EditStateFragmentColorOverride( fragColor ).

  3. Find the following line, where a color value is assigned to the output fragment color:

    fragColor = vec4( 1.0, 0.0, 0.0, 1.0 );
    
  4. Change the code to the following:

    Copy Text To Clipboard

    fragColor = vec4( 0.5, 0.5, 0.5, 1.0 );
  5. Save the changes to the fragment shader.

    Leave the fragment shader open in the text editor.

Examine The Document

  1. Return to the running Shader application. The color has changed from red to gray, which shows us the shader pipeline is active and that we can make more changes. This is a picture of the workspace.

Declare A Uniform

  1. Return to the text editor and examine the fragment shader.
  2. Add the following code immediately above out vec4 fragColor

    Copy Text To Clipboard

    uniform vec4 tint_color;
    Your fragment shader code looks like this:

    // #version 460
    // The version number is automatically injected by the application.
    // It is included above for reference purposes only.
    #include <SPA_Version.glsl>
    #include <SPA_Constants.glsl>
    #include <Modules/SPA_EditStateFragmentColorOverride.glsl>
    #include "user_basic_attributes.glsl"
    
    in Data { vertexData attributes; } DataIn;
    
    uniform vec4 tint_color;
    out vec4 fragColor;
    
    void main(void)
    {
       fragColor = vec4( 1.0, 0.0, 0.0, 1.0 );
       SPA_EditStateFragmentColorOverride( fragColor );
    }
    
  3. Modify the assignment to the fragment color:

    Copy Text To Clipboard

    fragColor = tint_color;
    Your fragment shader main function looks like this:

    void main(void)
    {
       fragColor = tint_color;
       SPA_EditStateFragmentColorOverride( fragColor );
    }
    
  4. Save the changes to the fragment shader.

    Leave the fragment shader open in the text editor.

Rebuild The Document

  1. Return to the running Shader application.

    Your shader is going to turn black when you return to the application. Depending on the behavior of your graphics driver you may see other colors as well. This is because we have not yet set a value for uniform vec4 tint_color. We're going to rebuild the document, which will add the uniforms we declared to the document so we can set their values.

  2. Select Graph » Build All from the main menu.

    The application rebuilds the document and displays build information in the output window.

    --- <Building Project 'D:\Release6\Content\Library\Shader\User Basic\User Basic.box'> ---
    
    Rebuilding Shader Resource Documents...
    
    Rebuild succeeded: D:\release6\content\library\shader\user basic\460\user_basic_vertex_shader.glsl
    Rebuild succeeded: D:\release6\content\library\shader\user basic\460\user_basic_fragment_shader.glsl
    
    Updating document contents...
    
    Adding to <UniformPaletteNode> 'Uniforms'  'uniform vec4 tint_color'
    
    Build completed.

Examine The Document

  1. Select Graph » State » Expand All Tree Items from the main menu.

    The graph looks like this. There is a new <Float32VectorNode> named uniform vec4 tint_color that matches the declarations in the shader source code. In the image below, the new node is highlighted red for illustrative purposes (but it isn't highlighted in your document).

    This is a picture of the graph.

Edit The <Float32VectorNode>

  1. Examine the hierarchy.
  2. Right click the <Float32VectorNode> named uniform vec4 tint_color and select Edit... from the listed options.

    This displays the <Float32VectorNode> property editor.

    This is a picture of the Float32Vector property editor.
  3. Set the Component[0] to 0.5.
  4. Set the Component[1] to 1.0.
  5. Set the Component[2] to 0.5.
  6. Set the Component[3] to 1.0.
  7. Click OK to dismiss the editor.

    The worksheet looks like this:

    This is a picture of the worksheet.

    This is generally how you set uniform values. You declare them in the shader and then rebuild the document to create nodes representing what you declared. In versions of GLSL higher than 120, you can also initialize uniforms when you declare them. If initialized in GLSL, the values of the <VariableNode> in the Shader app will match the initializer values you typed in the shader code. You can then configure the values of the new nodes to suit your purpose. Many uniform values are set by the user, as we just did, but later you'll learn about using <DataCapture> objects to capture values from the document and use them as uniform values. The other way to create uniforms, uniform buffers, is discussed in a subsequent exercise (but it requires the buffer add-on module).

Declare A Texture Sampler

  1. Return to the text editor and examine the fragment shader.
  2. Add the following code immediately after uniform vec4 tint_color

    Copy Text To Clipboard

    uniform sampler2D diffuse_texture;

    Your fragment shader code looks like this:

    // #version 460
    // The version number is automatically injected by the application.
    // It is included above for reference purposes only.
    #include <SPA_Version.glsl>
    #include <SPA_Constants.glsl>
    #include <Modules/SPA_EditStateFragmentColorOverride.glsl>
    #include "user_basic_attributes.glsl"
    
    in Data { vertexData attributes; } DataIn;
    
    uniform vec4 tint_color;
    uniform sampler2D diffuse_texture;
    
    out vec4 fragColor;
    
    void main(void)
    {
       fragColor = tint_color;
       SPA_EditStateFragmentColorOverride( fragColor );
    }
  3. Insert the texture sampling code immediately above the assignment to fragColor:

    Copy Text To Clipboard

    vec4 diffuse_color = texture( diffuse_texture, DataIn.attributes.texcoord );

    Your fragment shader main function looks like this:

    void main(void)
    {
       vec4 diffuse_color = texture( diffuse_texture, DataIn.attributes.texcoord );
       fragColor = tint_color;
       SPA_EditStateFragmentColorOverride( fragColor );
    }
    

    This code samples a texture using the texture coordinates computed by the vertex shader.

  4. Modify the assignment to the fragment color to multiply diffuse_color by tint_color:

    Copy Text To Clipboard

    fragColor = diffuse_color * tint_color;

    Your fragment shader main function looks like this:

    void main(void)
    {
       vec4 diffuse_color = texture( diffuse_texture, DataIn.attributes.texcoord );
       fragColor = diffuse_color * tint_color;
       SPA_EditStateFragmentColorOverride( fragColor );
    }
    
  5. Save the changes to the fragment shader.

    Leave the fragment shader open in the text editor.

Rebuild The Document

  1. Return to the running Shader application.

    Your shader is going to turn black when you return to the application. Depending on the behavior of your graphics driver you may see other colors as well. This is because we have not yet set a value for uniform sampler2D diffuse_texture. We're going to rebuild the document, which will create the uniforms we declared so we can set their values.

  2. Select Graph » Build All from the main menu.

    The application rebuilds the document and displays build information in the output window.

    --- <Building Project 'D:\Release6\Content\Library\Shader\User Basic\User Basic.box'> ---
    
    Rebuilding Shader Resource Documents...
    
    Rebuild succeeded: D:\release6\content\library\shader\user basic\460\user_basic_vertex_shader.glsl
    Rebuild succeeded: D:\release6\content\library\shader\user basic\460\user_basic_fragment_shader.glsl
    
    Updating document contents...
    
    Adding to <SamplerPaletteNode> 'Samplers' <SamplerNode> 'uniform sampler2D diffuse_texture'
    
    Build completed.
    

Load A Texture From Disk

  1. Select Graph » State » Expand All Tree Items from the main menu.

    The graph looks like this. There is a new <SamplerNode> named uniform vec4 diffuse_texture that matches the declarations in the shader source code. In the image below, the new node is highlighted red for illustrative purposes (but it isn't highlighted in your document). Notice also that the node has a red underline. If you mouse over the node, you can see a tip with the error message.

    t This is a picture of the graph.
  2. Right click over the <SamplerNode> named uniform sampler2D diffuse_texture and select Load Texture From Disk... from the listed options.

    This displays the file open dialog, which allows you to choose a 2D texture from the hard disk. There is a list of folders that organize textures by pixel format.

    This is a picture of the file open dialog.
  3. Type IPF_8888_ARGB to enter the folder containing textures of this pixel format.

    Copy Text To Clipboard

    IPF_8888_ARGB
  4. Type IPF_8888_ARGB.png and click Open or hit ENTER when you are finished.

    Copy Text To Clipboard

    IPF_8888_ARGB.png

Examine The Results

  1. Select Graph » State » Expand All Tree Items from the main menu.

    The software adds a <Texture> node named IPF_8888_ARGB to the document and connects the <SamplerNode> to the new texture.

    This is a picture of the graph.

    You can see the texture modified by the tint color. If you change the tint color uniform, then the results on screen will change.

    This is a picture of the desktop.
  2. Select File » Save from the main menu.

Declaring A Struct

  1. Return to the text editor and find your fragment shader code:

    // #version 460
    // The version number is automatically injected by the application.
    // It is included above for reference purposes only.
    #include <SPA_Version.glsl>
    #include <SPA_Constants.glsl>
    #include <Modules/SPA_EditStateFragmentColorOverride.glsl>
    #include "user_basic_attributes.glsl"
    
    in Data { vertexData attributes; } DataIn;
    
    uniform vec4 tint_color;
    uniform sampler2D diffuse_texture;
    
    out vec4 fragColor;
    
    void main(void)
    {
       vec4 diffuse_color = texture( diffuse_texture, DataIn.attributes.texcoord );
       fragColor = diffuse_color * tint_color;
       SPA_EditStateFragmentColorOverride( fragColor );
    }
    
  2. Insert the following code immediately above the line in Data { vertexData attributes; } DataIn;.

    Copy Text To Clipboard

    struct OutputColors
    {
       vec4 color_a;
       vec4 color_b;
    };
    
  3. Your fragment shader code looks like this:

    // #version 460
    // The version number is automatically injected by the application.
    // It is included above for reference purposes only.
    #include <SPA_Version.glsl>
    #include <SPA_Constants.glsl>
    #include <Modules/SPA_EditStateFragmentColorOverride.glsl>
    #include "user_basic_attributes.glsl"
    
    struct OutputColors
    {
       vec4 color_a;
       vec4 color_b;
    };
    
    in Data { vertexData attributes; } DataIn;
    
    uniform vec4 tint_color;
    out vec4 fragColor;
    
    void main(void)
    {
       vec4 diffuse_color = texture( diffuse_texture, DataIn.attributes.texcoord );
       fragColor = diffuse_color * tint_color;
       SPA_EditStateFragmentColorOverride( fragColor );
    }
    
  4. Insert the following code immediately after the line uniform sampler2D diffuse_texture;.

    Copy Text To Clipboard

    uniform OutputColors output_colors;
  5. Your fragment shader code looks like this:

    // #version 460
    // The version number is automatically injected by the application.
    // It is included above for reference purposes only.
    #include <SPA_Version.glsl>
    #include <SPA_Constants.glsl>
    #include <Modules/SPA_EditStateFragmentColorOverride.glsl>
    #include "user_basic_attributes.glsl"
    
    struct OutputColors
    {
       vec4 color_a;
       vec4 color_b;
    };
    
    in Data { vertexData attributes; } DataIn;
    
    uniform vec4 tint_color;
    out vec4 fragColor;
    uniform OutputColors output_colors;
    
    void main(void)
    {
       vec4 diffuse_color = texture( diffuse_texture, DataIn.attributes.texcoord );
       fragColor = diffuse_color * tint_color;
       SPA_EditStateFragmentColorOverride( fragColor );
    }
    
  6. Save the changes to the fragment shader.

    Leave the fragment shader open in the text editor.

Rebuild The Document

  1. Return to the running Shader application.
  2. Select Graph » Build All from the main menu.

    The application rebuilds the document and displays build information in the output window.

    --- <Building Project 'D:\Release6\Content\Library\Shader\User Basic\User Basic.box'> ---
    
    Rebuilding Shader Resource Documents...
    
    Rebuild succeeded: D:\release6\content\library\shader\user basic\460\user_basic_vertex_shader.glsl
    Rebuild succeeded: D:\release6\content\library\shader\user basic\460\user_basic_fragment_shader.glsl
    
    Updating document contents...
    
    Adding to <UniformPaletteNode> 'Uniforms' <StructInstanceNode> 'uniform OutputColors output_colors'
    
    Build completed.

Examine The Document

  1. Select Graph » State » Expand All Tree Items from the main menu.

    The graph looks like this. There is a new <StructInstanceNode> named uniform OutputColors output_colors that matches the declarations in the shader source code. In the image below, the new node is highlighted red for illustrative purposes (but it isn't highlighted in your document).

    This is a picture of the graph.

    If you move the mouse over the new <StructInstanceNode> named uniform OutputColors output_colors, you'll see a hint.

    This is a picture of the graph.

    This message is used to let you know that a <StructInstanceNode> either cannot be found in your GLSL code, or that none of the declarations in the struct have been used in the shader code. You generally don't have to worry about this message if you have a struct declared, but aren't using it for some reason. However, you should pay attention if you are using a struct, and you see this message or similar messages.

Edit The Struct Data Members

  1. Examine the hierarchy and find the <StructInstanceNode> named uniform OutputColors output_colors.
  2. Right click over the <StructInstanceNode> named uniform OutputColors output_colors and select Display Data Member Properties... from the listed options.

    This displays a list of the struct data members.

    This is a picture of the struct data member selector dialog.
  3. Select output_colors.color_a from the list of data members and click OK or hit ENTER when you are finished.

    This displays <StructInstanceNode> properties in the property editor.

    This is a picture of the property editor.
  4. Examine the property editor and find the property group named Edit Float32Vector Member.

    You may need to scroll down to find it.

    This is a picture of the property editor.
  5. Set the value of float32[0] to 1.0.

    The property field float32[0] represents the x component of the vector.

  6. Examine the property editor and find the property group named Data Member Properties.

    It's a few items above the end of the property editor.

    This is a picture of the property editor.
  7. Find the property field named Data Member.

    This property field has two columns.

  8. Left click the right column and select @1 output_colors.color_b from the drop down list of struct data members.

    The property sheet may take a moment to update.

  9. Examine the property editor and find the property group named Edit Float32Vector Member.
  10. Set the value of float32[1] to 1.0.

    The property field float32[1] represents the y component of the vector. NOTE: make sure you change the value of float32[1].

  11. Select File ® Save from the main menu.

Using The Data Members

  1. Return to the text editor and find your fragment shader code:

    // #version 460
    // The version number is automatically injected by the application.
    // It is included above for reference purposes only.
    #include <SPA_Version.glsl>
    #include <SPA_Constants.glsl>
    #include <Modules/SPA_EditStateFragmentColorOverride.glsl>
    #include "user_basic_attributes.glsl"
    
    struct OutputColors
    {
       vec4 color_a;
       vec4 color_b;
    };
    
    in Data { vertexData attributes; } DataIn;
    
    uniform vec4 tint_color;
    uniform sampler2D diffuse_texture;
    uniform OutputColors output_colors;
    
    out vec4 fragColor;
    
    void main(void)
    {
       vec4 diffuse_color = texture( diffuse_texture, DataIn.attributes.texcoord );
       fragColor = diffuse_color * tint_color;
       SPA_EditStateFragmentColorOverride( fragColor );
    }
  2. Change the line that assigns to the fragColor output variable.

    Copy Text To Clipboard

    fragColor = diffuse_color * output_colors.color_a;
  3. Save the shader code and return to the running shader application.

    You'll notice the tint color now uses red instead of green. This is a picture of the tint color change.

    If you move the mouse over the <StructInstanceNode> named uniform OutputColors output_colors, you'll see that the message has changed, indicating that one of the uniforms has been set on the GPU.

    This is a picture of the tint color change.

    See if you can figure out how to use output_colors.color_b and maybe even change the color values by yourself.

Explore Directory Structure

  1. Select Tools » Deselect All from the main menu.
  2. Select File » Open Containing Folder from the main menu.

    The software opens the directory containing your new shader document. Each of these folders contains the shader code for the correspoding GLSL version. In this example, we created a GLSL shader for the highest version on your machine. For example, the shader code we want to find is in the 460 folder or similar.

    This is a picture of the directory that contains your new shader document.
    File Description
    460A folder containing the shader source code and other elements.
    USER BASIC.BOXThe shader document we worked in.
    USER BASIC.BOX.PREVA copy of the document saved each time you rebuild.
    USER BASIC.PROGRAM.GLSL.OBJECTS.BOX.BLDThis contains nodes representing the declarations in your shader. This document changes each time you rebuild the shader document.

    These documents are modified from time-to-time.

  3. Double click the folder named 460. This is a picture of the directory that contains your new shader source code.
    File Description
    USER_BASIC_ATTRIBUTES.GLSLGLSL source code that declares a struct containing the vertex attributes layout for this document. This is an ASCII file that can be opened in any text editor.
    USER_BASIC_FRAGMENT_SHADER.BOX.BLDThe fragment shader build file. A .BLD document contains nodes that represent GLSL items such as shader buffers and uniforms. This document is not created or managed by the user, but it can be opened with the Shader app and inspected.
    USER_BASIC_FRAGMENT_SHADER.GLSLContains the fragment shader source code. This is an ASCII file that can be opened in any text editor.
    USER_BASIC_VERTEX_SHADER.BOX.BLDThe vertex shader build file. A .BLD document contains nodes that represent GLSL items such as shader buffers and uniforms. This document is not created or managed by the user, but it can be opened with the Shader app and inspected.
    USER_BASIC_VERTEX_SHADER.GLSLContains the vertex shader source code. This is an ASCII file that can be opened in any text editor.
  4. Close the Windows® Windows® folder.

    This exercise is complete. Return to tutorials.